
Preparing for Insulation: Your Step-by-Step Home Preparation Guide
Picture this: you've finally decided to tackle your home's energy efficiency, and you're ready to transform your house from an energy-guzzling monster into a cozy, efficient haven. But preparing for insulation isn't just about calling the pros and waiting – there's some important groundwork that can make or break your project's success.
Think of preparing for insulation like prepping for a dinner party – you wouldn't start cooking without clearing your kitchen counters and gathering your ingredients, right? The same principle applies here. Proper preparation makes the difference between a smooth, successful insulation installation and a frustrating experience that might not deliver the energy savings you're expecting.
When you're preparing for insulation, you're setting the foundation for years of comfort and lower energy bills. Let's walk through everything you need to know about this preparation process, so when the installation team arrives, your home is ready to become the energy-efficient sanctuary you've been dreaming of.
Why Preparing for Insulation Matters More Than You Think
Before diving into the step-by-step process, let's talk about why preparing for insulation properly can make or break your entire project. You might think preparation is just about moving some boxes around, but it's actually the foundation of effective insulation installation.
When homeowners skip proper preparation steps, they often end up with:
Incomplete air sealing that reduces insulation effectiveness
Moisture problems that compromise indoor air quality
Installation delays and additional costs
Subpar energy efficiency results
On the flip side, thorough preparation when you're preparing for insulation sets you up for maximum energy savings and a smooth installation process.
Understanding Your Home's Current Insulation Situation
The first step in preparing for insulation is understanding what you're working with. This assessment phase is critical because it determines everything else about your preparation process.
Assessing Your Existing Insulation
Start by examining your existing insulation in key areas like attics, crawl spaces, and basement walls. Look for signs of wear, settling, or damage that might compromise your home's energy efficiency. You're looking for gaps, compressed areas, or insulation that looks like it's seen better days.
Check if your current insulation material is adequate for your climate zone
Measure the depth and calculate the R value of what's already there
Look for moisture problems that could indicate ventilation issues
Note any areas where insulation has shifted or settled over time
Identifying Problem Areas
Your home might be sending you signals about where insulation installation is most needed. Cold spots in winter, hot zones in summer, and those energy bills that make you wince – these are all clues pointing to areas that need attention.
The Complete Preparing for Insulation Checklist

This is where the rubber meets the road in your preparation process. Think of this checklist as your roadmap for preparing for insulation success. Just like a won’t work properly without fuel, you want your space ready for optimal results.
Clearing and Organizing Your Space
Attic Preparation
Your attic spaces need to be accessible and clear for the installation team. Remove stored items, old decorations, and anything that might be camping out up there.
Clear pathways to ensure proper ventilation around work areas
Remove or secure loose items that could fall during the installation process
Check that the attic hatch is easily accessible and functioning properly
Ensure adequate lighting for safety during the work
Crawl Space Preparation
Crawl spaces can be challenging work environments, so proper preparation is key for installing insulation effectively.
Remove debris, old insulation materials, or stored items
Check for pest issues that need addressing before adding insulation
Ensure crawl spaces have proper ventilation to prevent moisture buildup
Install temporary lighting if needed for the installation team
Common Mistakes to Avoid When Preparing for Insulation
Learning from others' mistakes can save you time, money, and frustration. Here are the most common pitfalls homeowners encounter when preparing for insulation:
Rushing the Air Sealing Process Many people want to jump straight to the insulation installation, but inadequate air sealing undermines everything. When you're preparing for insulation, air sealing should get just as much attention as the insulation material itself.
Ignoring Moisture Issues Moisture problems don't magically disappear when you add insulation. In fact, they can get worse. Part of preparing for insulation involves addressing any moisture concerns before they become bigger problems.
Inadequate Access Planning Don't underestimate how much space installers need to work effectively. Poor access planning can turn a straightforward job into a complex puzzle.
Air Sealing: The Foundation of Preparing for Insulation
Before any insulation material goes in, tackling air leaks is a critical part of preparing for insulation. Think of your home like a leaky boat – you wouldn't just add more life jackets; you'd patch the holes first.
When you're preparing for insulation, air sealing should be your priority because even the best insulation material won't perform well if air is flowing freely around it.
Around windows and doors where drafts commonly occur
Near electrical boxes and light fixtures that penetrate walls
Around the attic hatch and any access points
At wall studs where gaps might exist
Near recessed lights that can create thermal bridges
Using the Right Sealing Materials
Sealing Air Leaks Around Key Areas
Air sealing is like giving your home a good foundation before building up. When preparing for insulation, here's where to focus your attention:
Spray foam for larger gaps and hard to reach areas
Caulk for smaller cracks around windows and doors
Weatherstripping for moveable components like doors
Expanding foam for irregular spaces that need filling
Using the Right Sealing Materials
Different areas need different approaches when you're preparing for insulation and sealing air leaks effectively:
Ventilation: Critical Component of Preparing for Insulation
Proper ventilation is like your home's respiratory system – it needs to breathe correctly to stay healthy. When preparing for insulation, ensuring adequate ventilation is just as important as the insulation material itself.
Attic Ventilation Preparation
Your attic needs balanced airflow to prevent moisture buildup that could compromise your new insulation.
Intake and Exhaust Balance
Check that soffit vents are clear and unobstructed
Ensure exhaust fans are working properly and venting outside
Verify that ridge vents or other exhaust systems are functioning
Remove any blockages that might restrict airflow
Moisture Control Strategies
Preventing moisture buildup is critical for maintaining indoor air quality and protecting your insulation investment.
Install or repair vapor barrier where needed
Check that bathroom exhaust fans vent outside, not into attic spaces
Address any plumbing leaks or moisture sources
Ensure proper ventilation in crawl spaces to prevent condensation
Basement and Crawl Space Ventilation
These areas need special attention because they're prone to moisture problems that can affect your entire home's energy efficiency.
Foundation Ventilation Considerations
Check foundation vents for proper operation
Address any standing water or moisture issues
Install dehumidification if needed in problem areas
Ensure basement walls are properly prepared for insulation
Choosing Your Insulation Materials
With your space prepared, it's time to think about what type of insulation material will work best for your specific situation.
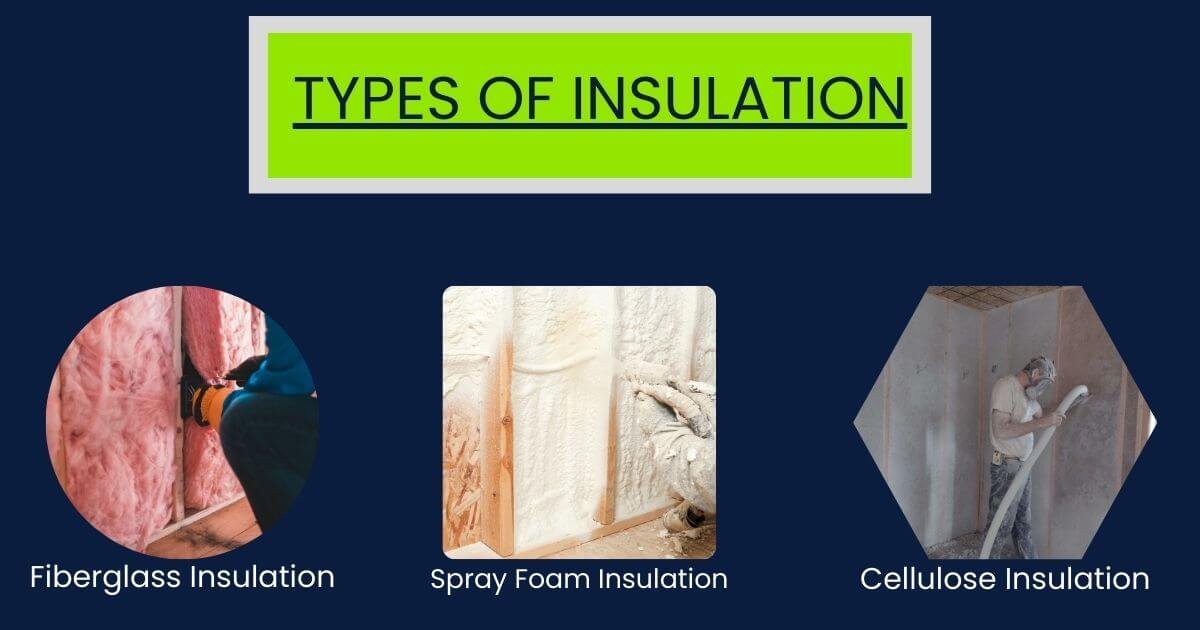
Understanding Different Insulation Types
Batt Insulation Options
Batt insulation comes in several forms, each with specific benefits:
Fiberglass batts are cost-effective and widely available
Mineral wool batts offer excellent fire resistance and sound dampening
Both types work well for standard wall stud spacing
Spray Foam Insulation Benefits
Spray foam insulation offers some advantages that other materials can't match:
Creates an air barrier while providing insulation
Expands to fill gaps and irregular spaces
Offers higher R value per inch than traditional materials
Works well in hard to reach areas where other materials struggle
Loose Fill and Blown-In Options
These materials work particularly well for certain applications:
Blown in insulation can fill irregular spaces effectively
Loose fill insulation works well for adding insulation to existing areas
Both options can achieve good coverage in attic floors
Safety Considerations and Protective Measures
Safety isn't just about following rules – it's about protecting your home and family throughout the installation process.
Protecting Your Home During Installation
Surface Protection Strategies
Use plastic sheeting to protect floors and furniture
Cover light fixtures and electrical components
Protect HVAC equipment from dust and debris
Seal off living areas from work zones
Electrical Safety Measures
Working around electrical components requires extra attention:
Turn off power to circuits in work areas
Protect electrical boxes from insulation contact
Ensure recessed lights are rated for insulation contact
Address any wiring issues before installing insulation
Personal Safety Equipment
Even if professionals are doing the work, understanding safety requirements helps you prepare properly:
Respiratory protection from insulation fibers
Eye protection from airborne particles
Protective clothing to prevent skin irritation
Proper lighting for safe navigation in work areas
Special Considerations for Different Home Areas
Different parts of your home have specific requirements for proper insulation installation.
Exterior Walls and Thermal Bridging
Wall insulation requires careful attention to detail:
Identify thermal bridges at wall studs that need addressing
Plan for insulating around windows and doors effectively
Consider how wall insulation will integrate with other building envelope improvements
Address any structural issues before installing insulation
Knee Walls and Unconventional Spaces
These areas often get overlooked but can significantly impact your home's energy efficiency:
Plan access routes for installing insulation in tight spaces
Consider using rigid foam for areas with limited depth
Address air sealing challenges in irregular spaces
Use furring strips where needed to create proper installation depth
Working with Professional Insulation Services
While some preparation tasks you can handle yourself, knowing when to call in professional insulation services can save you time, money, and frustration.
What to Expect During Professional Installation
The Installation Process Timeline
Understanding the typical installation process helps you prepare appropriately:
Initial assessment and preparation verification
Air sealing and prep work completion
Insulation material installation in planned sequence
Quality checks and cleanup procedures
Communication with Your Installation Team
Good communication leads to better results:
Discuss your energy efficiency goals and expectations
Review access requirements and any special considerations
Understand the timeline for completing different areas
Plan for any disruptions to your daily routine
DIY vs. Professional Installation
Some aspects of preparing for insulation you can handle yourself, while others benefit from professional expertise:
Tasks You Can Handle
Basic cleaning and organizing of work areas
Simple air sealing with caulk or weatherstripping
Removing stored items from attics and crawl spaces
Basic moisture control measures
When to Call Professionals
Complex air sealing around structural elements
Spray foam insulation installation
Electrical work related to recessed lights or wiring
Structural issues that affect insulation installation
Energy Efficiency Goals and Expectations
Setting realistic expectations helps you prepare mentally and financially for your insulation project.
Calculating Potential Energy Savings
Understanding your potential return on investment helps justify the preparation effort:
Review your current energy bills to establish a baseline
Research typical energy savings for your home type and climate
Consider how improved energy efficiency will affect your utility costs
Factor in potential cooling bills reduction during summer months
Long-term Benefits Beyond Energy Bills
Improved indoor air quality throughout your home
Better temperature consistency and comfort
Reduced wear on your HVAC system
Increased home value and marketability
Setting Realistic Timeline Expectations
Preparation Phase Timeline

Basic cleaning and organizing: 1-2 days
Air sealing and minor repairs: 2-3 days
Professional assessment and planning: 1 day
Final preparation and staging: 1 day
Installation Timeline Factors
The actual installation process timeline depends on several factors:
Size and complexity of your home
Types of insulation material being installed
Weather conditions for exterior work
Discovery of unexpected issues during installation
Post-Installation Considerations
Even though this guide focuses on preparing for insulation, thinking ahead to post-installation helps you prepare more effectively.
Maintaining Your Investment
Regular Inspection Schedule
Annual visual checks of accessible insulation areas
Monitoring for signs of settling or damage
Checking that air sealing remains intact
Ensuring proper ventilation continues functioning
Protecting Indoor Air Quality Long-term
Monitor humidity levels to prevent moisture problems
Maintain exhaust fans and ventilation systems
Address any new air leaks promptly
Keep attic access areas properly sealed
Cost-Effective Preparation Strategies
Smart preparation can help you get the most value from your insulation investment.
Budget-Friendly Preparation Tips
DIY Preparation Tasks
Focus your own efforts on tasks that don't require specialized skills:
Clearing and organizing work areas yourself
Basic cleaning of surfaces where insulation will be installed
Simple caulking and weatherstripping projects
Researching and comparing insulation material options
Timing Your Project Strategically
Schedule during off-peak seasons for better pricing
Combine with other energy efficiency improvements
Take advantage of utility rebates and tax incentives
Plan around your family's schedule for minimal disruption
Maximizing Your Insulation Investment
Whole-House Approach Benefits
Rather than tackling one area at a time, consider a comprehensive approach:
Address all major thermal envelope issues together
Coordinate air sealing with insulation installation
Plan for proper ventilation throughout the home
Consider how different areas interact for optimal energy efficiency
Final Thoughts: Mastering the Art of Preparing for Insulation
Preparing for insulation might seem like a lot of work, but think of it as setting the stage for years of comfort and energy savings. Just like a well-prepared foundation makes for a stronger house, proper preparation makes for more effective insulation installation.
The time you invest in preparing for insulation properly will pay dividends in the long run. Every step of preparation – from air sealing to organizing work areas – contributes to better results and a smoother installation process.
Remember, preparing for insulation isn't just about the day of installation. It's about creating the conditions for long-term success. When you take the time to prepare properly, you're investing in years of improved comfort, lower energy bills, and better indoor air quality.
Whether you're tackling a whole-house insulation upgrade or focusing on specific problem areas, the principles of preparing for insulation remain the same. Take your time, follow the process, and don't skip steps that might seem minor – they all contribute to the bigger picture.
Ready to transform your home into the energy-efficient, comfortable space you've been dreaming of? With this guide to preparing for insulation, you're well-equipped to set your project up for success. Remember, proper preparation is the difference between good results and great results.
